Visitor Parttern
参考资料:
http://en.wikipedia.org/wiki/Visitor_Pattern wiki Visitor Pattern
Visitor Pattern:
模式背景: 今天在看<<java 并发编程 设计原则与模式>>中, 涉及到了Visitor模式. 在并发过程中, 当一个类中持有一个集合的时候, 如果需要遍历这个集合,
就不能单纯的考虑把整个集合返回给调用方.因为这样就给调用方提供了改变集合的操作. 试想,当你花费了大量的synchronized方法或者使用了多
么高明的lock-free算法进行性能上的优化,一旦你向外界返回了你要保护的对象,一切都将是一场"灾难". 矛盾的是, 你无法预测客户会使用什么样
的方式来进行对你集合中的元素进行操作. 困难如下:
    private List<T> yourList;
    .....

    public synchronized void  doIterator(){

          for(T t: yourList){

              <how to do with element e ...??>

              }
    }
你如何确认对方需要做的操作时什么呢? 答案是没有. 基于面对对象的操作. 遍历的方式不变, 如果是串行的数据结构,无非就是循环. 如果是树状结构那么可能会不一样的遍历方式. 就如同蛋糕店中一样,他们给你返回了蛋糕,可是要怎么去吃,那是你自己的事情. 想到这点, 就应该清楚一件事情, 调用方的操作理应"自己知道".那么就变成了如下的形式:
    private List<T> yourList;
    .....

    public void doIterator(Client : client){

          for(T t: yourList){

               client.doWithElemnt(t);
              }
    }
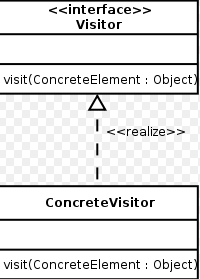
看到这里, 也许还有问题: 我怎么知道你是使用"doWithElemnt(..)"这个方式去消费呢? 换句话说,这是一种约定,java中,标准时用Interface来表示. 这样就形成了这样的一个"调用方"的结构:

当有client来遍历的时候,就调用它的visit方法,并把蛋糕给他. 事情就是这么简单!
客户的问题解决了,但是客户真正想要的是蛋糕,并不是整个"蛋糕池". 理解这一点很重要, 因为它进一步确定了我们不应该在doIterator方法中调用客户端.
而是应该在List<T>的每一个t上调用,代码进一步更改:
    private List<T> yourList;
    .....

    public void doIterator(){

          for(T t: yourList){

                  t.accept(visitor);
              }
    }

   ... T 中的accept方法如下:
       visitor.visit(this);
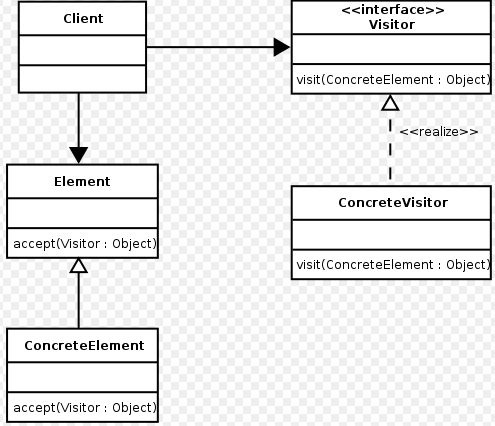
如此一来, doIterator方法拜托了visitor的依赖. 那么,在doIterator方法中,有怎么样知道就是需要调用t.accept()方法呢? 一样地, Interface的标准化.
这么一来,就形成了visitor模式:

结束语: 可以使用java Reflection的反射机制使得Viditor模式更加具有灵活性.
java Dynamic Proxy
参考资料:
http://www.ibm.com/developerworks/java/library/j-jtp08305.html
http://download.oracle.com/javase/1.4.2/docs/guide/reflection/proxy.html
说明: 示例代码来自上述的文章, 此blog为笔者的一些记录以方便以后回忆此部分知识. 大家可以直接LINK到上面的两个连接来看完整的代码更加好一些.感谢Link中的作者.
java reflection :
java.lang.relect包中有三个类: Constructor,Field,Method. 这三个类描述了Java类的组成. java.lang.reflect.Modifier则提供一些方法接受前面三者的getModifier()返回的int值,根据这些值判断是否为private,public...
java Dynamic Invocation:
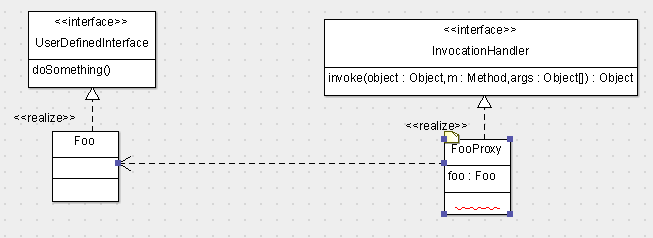
类图如下:

从类图中看, FooProxy是代理了UserDefinedInterface这个接口的实现类Foo类. 具体的示例代码如下:
            private Object object;

	private FooProxy(Object object){
	      this.object = object;
	}


          public static Object newInstance(Object obj) {

	        return java.lang.reflect.Proxy.newProxyInstance(
	 			                       obj.getClass().getClassLoader(),
				                       obj.getClass().getInterfaces(),
				                       new FooProxy(obj));
	}

      // NOTE: 代理返回的是一个接口代理;

	public Object invoke(Object proxy, Method method, Object[] args)
			throws Throwable {

		Object result;

		try {
		      System.out.println("before method " + method.getName());
                              //下面是真正的去调用接口方法,使用接口的一个实现类;
		       result = method.invoke(object, args);

	        } catch (InvocationTargetException e) {
		                 throw e.getTargetException();
	        } catch (Exception e) {
		             throw new RuntimeException("unexpected invocation exception: " +
					       e.getMessage());
		} finally {
		    System.out.println("after method " + method.getName());
		}


		return result;
	}

客户端调用:
               UserdefinedInterface foo = (UserdefinedInterface) FooProxy.newInstance(new Foo());//Cast成接口,而不是实现类;
         String result = foo.doSomething("judy");
Note : 客户端的调用要Cast成接口而不是实现类,否则会抛出: java.lang.ClassCastException
接下来,如果想要完成代理多个实现类,多接口. 或者说多个接口由多个实现类来实现,想要针对不同的接口里的方法使用不同的实现类来完成, 那么可以参考下面的一个官方示例:
public class Delegator implements InvocationHandler {

    // preloaded Method objects for the methods in java.lang.Object
    private static Method hashCodeMethod;
    private static Method equalsMethod;
    private static Method toStringMethod;
    static {
	try {
	    hashCodeMethod = Object.class.getMethod("hashCode", null);
	    equalsMethod =
		Object.class.getMethod("equals", new Class[] { Object.class });
	    toStringMethod = Object.class.getMethod("toString", null);
        } catch (NoSuchMethodException e) {
	    throw new NoSuchMethodError(e.getMessage());
	}
    }

    private Class[] interfaces;
    private Object[] delegates;

    public Delegator(Class[] interfaces, Object[] delegates) {
	this.interfaces = (Class[]) interfaces.clone();
	this.delegates = (Object[]) delegates.clone();
    }

    public Object invoke(Object proxy, Method m, Object[] args)
	throws Throwable
    {
	Class declaringClass = m.getDeclaringClass();

	if (declaringClass == Object.class) {
	    if (m.equals(hashCodeMethod)) {
		return proxyHashCode(proxy);
	    } else if (m.equals(equalsMethod)) {
		return proxyEquals(proxy, args[0]);
	    } else if (m.equals(toStringMethod)) {
		return proxyToString(proxy);
	    } else {
		throw new InternalError(
		    "unexpected Object method dispatched: " + m);
	    }
	} else {
	    for (int i = 0; i < interfaces.length; i++) {
		if (declaringClass.isAssignableFrom(interfaces[i])) {
		    try {
			return m.invoke(delegates[i], args);
		    } catch (InvocationTargetException e) {
			throw e.getTargetException();
		    }
		}
	    }

	    return invokeNotDelegated(proxy, m, args);
	}
    }

    protected Object invokeNotDelegated(Object proxy, Method m,
				        Object[] args)
	throws Throwable
    {
	throw new InternalError("unexpected method dispatched: " + m);
    }

    protected Integer proxyHashCode(Object proxy) {
	return new Integer(System.identityHashCode(proxy));
    }

    protected Boolean proxyEquals(Object proxy, Object other) {
	return (proxy == other ? Boolean.TRUE : Boolean.FALSE);
    }

    protected String proxyToString(Object proxy) {
	return proxy.getClass().getName() + '@' +
	    Integer.toHexString(proxy.hashCode());
    }
}

调用的客户端如下, 也可以将Proxy.newInstance(..)方法进一步的封装:
    Class[] proxyInterfaces = new Class[] { Foo.class };
    Foo foo = (Foo) Proxy.newProxyInstance(Foo.class.getClassLoader(),
	                                                   proxyInterfaces,
	                                                   new Delegator(proxyInterfaces, new Object[] { new FooImpl() }));
下面接着介绍些相关Dynamic Proxy的应用:
1 使用泛型完成公用的代理类:
public class SetProxyFactory {

    public static Set getSetProxy(final Set s) {
        return (Set) Proxy.newProxyInstance
          (s.getClass().getClassLoader(),
                new Class[] { Set.class },
                new InvocationHandler() {
                    public Object invoke(Object proxy, Method method,
                      Object[] args) throws Throwable {
                        return method.invoke(s, args);
                    }
                });
    }
}
2 使用动态代理来完成javaBean getter..setter..拦截并用自己Map缓存的方式来完成:
public class JavaBeanProxyFactory {
    private static class JavaBeanProxy implements InvocationHandler {
        Map<String, Object> properties = new HashMap<String,
          Object>();

        public JavaBeanProxy(Map<String, Object> properties) {
            this.properties.putAll(properties);
        }

        public Object invoke(Object proxy, Method method,
          Object[] args)
          throws Throwable {
            String meth = method.getName();
            if (meth.startsWith("get")) {
                String prop = meth.substring(3);
                Object o = properties.get(prop);
                if (o != null && !method.getReturnType().isInstance(o))
                    throw new ClassCastException(o.getClass().getName() +
                      " is not a " + method.getReturnType().getName());
                return o;
            }
            else if (meth.startsWith("set")) {
                // Dispatch setters similarly
            }
            else if (meth.startsWith("is")) {
                // Alternate version of get for boolean properties
            }
            else {
                // Can dispatch non get/set/is methods as desired
            }
        }
    }

    public static<T> T getProxy(Class<T> intf,
      Map<String, Object> values) {
        return (T) Proxy.newProxyInstance
          (JavaBeanProxyFactory.class.getClassLoader(),
                new Class[] { intf }, new JavaBeanProxy(values));
    }
}
3 下面是关于JDK Proxy.newInstance(...)方法的一些源码, 首先,这个方法会根据传入的classLoader 和接口来生成一个"代理对象",在代理对象中把第三个参数,也就是实现了InvocationHandler的类传入生成的对象中. 在调用"代理对象"的相关方法的时候,会使用这个invocation中的invoke(...)方法完成. 也就是说,生成的"代理对象"持有InvocationHandler的实例.
         ....  .....
        Class cl = getProxyClass(loader, interfaces);//生成"动态"代理
	try {
            //接下来就是传递invocationHandler(h)
	    Constructor cons = cl.getConstructor(constructorParams);
	    return (Object) cons.newInstance(new Object[] { h });

         ...   ....