Grails (一)
参考资料:
InfoQ ----- Grails 入门指南:
http://www.cjsdn.net/doc/jvm/grails/docs/1.1/guide/2.%20Getting%20Started.html#2.5%20Getting%20Set-up%20in%20an%20IDE Grails Getting Started
Grails 安装配置:
1 下载grails : http://grails.org/Download 获取grails
2 解压, 类似JDK一样配置:GRAILS_HOME=%groovy_install_root%;
并将%groovy_install_root%bin 追加到PATH环境变量中[注: %groovy_install_root%是grails解压后的目录];
3 cmd 运行 grails 以检查配置的正确性;
创建Grails项目
到达你指定的一个grails work space, 在cmd中cd 到此目录,运行命令: grails create-app <your_app_name>;
从命令的执行信息看出grails会去下载一些jar包,包括了spring,Hibernate ,commons-*,ejb3,servlet,以及日志jar包等等; 其实,在你解压
的grails目录下面的lib目录中就有相关的jar包,之所以create-app命令执行比较快是因为其不用网络下载. 就向maven引用本地jar包一样. 此
目录的输出是: 建立C:\Documents and Settings\User\.grails 目录;
建立C:\Documents and Settings\User\.ivy2 目录[包含jar包]
建立相关的工程目录如下截图:
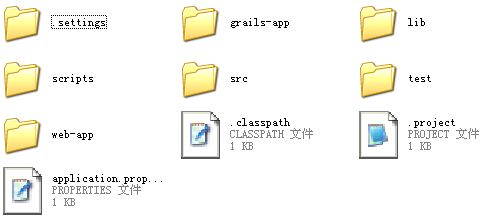
可以看到.classpath文件和.project文件. 可以带入到eclipse当中; 导入的时候, 可能会报错: 无法找到groovy.lang.GroovyObjectjar包,
此时可以到C:\Documents and Settings\User\.ivy2中找到groovy-all的依赖包. 工程加入jar包以后就没问题了.
创建相关的领域模型:
上一个步骤创建了相关的目录结构,在grails中,是使用"惯例大于配置"的方式. 使用这样的方式可以省去很多繁琐的配置文件信息. 具体每个目录代表什么意思,
请参考: http://www.cjsdn.net/doc/jvm/grails/docs/1.1/guide/2.%20Getting%20Started.html#2.5%20Getting%20Set-up%20in%20an%20IDE
下面创建一个User 类的domain model:
              cd <刚刚创建的app目录>
              grails create-domain-class com.hcl.domain.Student
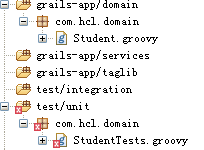
上面的命令告诉grails,在<your-app-root-dir>\grails-app\domain 下面创建一个包:com.hcl.domain 再创建一个类:Student.groovy 由于Grails是敏捷开发的工具,
避免不了TDD的思想,于是,grails还会在工程<your-app-root-dir>\test\unit 下面添加单元测试文件com.hcl.domain.StudentTests.Groovy.如下截图:
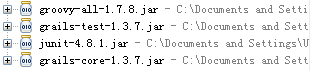
注意,当你将工程导入Eclipse的时候,加入依赖的jar包[截止此步骤至少含有的jar包]:
开始编写你的Student类吧,如果使用过Hibernate, 就应该很快了. 首先看看grails生成的Student.groovy文件:
class Student {

    static constraints = {
    }
}

static constrants是grails自动生成的, 至于作用是什么,等等再介绍.
下面考试添加一些属性:
class Student {

    String studentName;
    long studentNumber;
    Integer studentAge;
    Date studentBirthDay;
    String studentPhone;

    static constraints = {
    }
}

使用哪个同样的方式[grails create-domain-class com.hcl.domain.Teacher],或者直接在Eclipse上创建相关的脚本文件Tearch:

class Teacher {

    String teacherName;
    String teacherNumber;
    Integer teacherAge;
    String teacherPoneNumber;

    static constraints = {
    }
}

NOTE: [下面给出一些比较犀利的使用方法, 只是作为提醒, 如果使用到,就到官方文档库里面搜搜吧.]

      1  Grails允许你定义一些特殊地位字段,所谓特殊就是grails会对这些字段进行"特殊关照". 例如: Date dateCreated 和 Date lastUpdated 等等.
         详细说明请参考相关给出的文档;

      2  Grails允许你使用Groovy闭包来定义相关的一些类似"触发器"的程序;

      3 在static mapping ={..}闭包中,可以使用"sort "Property" " 之类的结果映射附加操作.
        请参考:http://grails.org/GORM+-+Mapping+DSL 这篇文档;
创建Controller:
使用 grails create-controller com.hcl.controllers.Student 来创建一个关于Student的控制器. grails会自动在Student后面加上
Controller: StudentController
class StudentController {

    def index = { }
 }

命令同样会生成相关的测试类:
import grails.test.*

class StudentControllerTests extends ControllerUnitTestCase {
    protected void setUp() {
        super.setUp()
    }

    protected void tearDown() {
        super.tearDown()
    }

    void testSomething() {

    }
}

当然,同样需要将相关的依赖jar包导入, jar包路径和在生成domain的时候一样的方式寻找.
在StudentController中添加代码如下:
    def index = {
        render("Hello ,Grails World!");
        }

    def helloStudent = {
        render("Hello Student!");
        }
现在可以启动项目了, 可以首先使用:grails help 命令查看grails的相关命令,发现:grails run-app 然后敲此命令:
打开浏览器:

http://localhost:8080/<your_app_name>/student[注意,student是我们创建的controller],这个时候浏览器显示:

"Hello,Grils World!"

敲入:

 http://localhost:8080/<your_app_name>/student/helloStudent [helloStudent是在StudentController中添加的一个闭包] 验证一下是否打印出"Hello Student!"

通过上面的运行结果看出:
 Grails 首先去找你的conreoller,找到以后再找你url后面跟着的groovy闭包名称, 然后执行. 最后使用render("")方法渲染页面.
 整个过程没有任何配置文件的干预, 可见上面叫"约定大于配置"原则.

再看看一个相当神奇的controller属性: <添加一个属性到StudentController.groovy文件>如下: def scaffold = Student;
添加完毕以后注意引入包:import com.hcl.domain.* 并且把相关的闭包都去掉!!!; 代码如下:
class StudentController {

	def scaffold = Student;

//注意把下面的闭包注释掉:
//    def index = {
//		render("Hello ,Grails World!");
//		}
//
//	def helloStudent = {
//		render("Hello Student!");
//		}
}


进入:http://localhost:8080/racetrack/student/  截图如下[现在暂时没有数据,如果有数据,会是一个关于Student的列表!!!]:
 点击右边的"New Student" ,截图如下:
 看到了么? 神奇的地方时只用了一个def scaffold = Student;属性.
code_money_guji
分类
- 性能
- Jms
- Groovy
- 敏捷/TDD
- Apache-Camel
- javaSE
- jvm
- Apache-commons-collections
- 未分类
- Concurrency in java
- javaNIO & Mina
- taobao WEBX
- NoSQL
- Linux
- Spring 源代码分析
- java 内存
- C/C++
- 算法/数据结构
- 设计模式/架构
- Apache-common-pool/dbcp
- Happy_Code_Mokey
- java 常见问题
- maven
- Somthing More
- web_front-end
- 代码重构
2011年3月21日 18:57
我也搞了一个 呵呵 名字很霸道 发了一篇hello world