Groovy Process Xml(创建XML)
参考资料:
http://groovy.codehaus.org/Creating+XML+using+Groovy%27s+MarkupBuilder
NOTE: 这是笔者的备忘录BLog,如果代码有运行不成功的, 请访问上面给出的链接. 感谢Groovy社区的所有Groovy Monkey 谢谢!
Groovy处理XML之创建XML:
一 简单的创建实例:
def stringWriter = new StringWriter();
def xml = new MarkupBuilder(stringWriter);
//红色表示元素, 绿色表示属性, 黄色表示元素的text值
xml.cars() {
	   car(name:"car1",no:"1") {
		     country('china')
	                  city('kunming')
		   }

	   car(name:"car2",no:"2") {
		   country('china')
		   city('kunming')
		 }

	   car(name:"car3",no:"3") {
		   country('china')
		   city('kunming')
		 }

	}

println stringWriter
//打印结果如下:
<cars>
  <car name='car1' no='1'>
    <country>china</country>
    <city>kunming</city>
  </car>
  <car name='car2' no='2'>
    <country>china</country>
    <city>kunming</city>
  </car>
  <car name='car3' no='3'>
    <country>china</country>
    <city>kunming</city>
  </car>
</cars>

对比示例程序和输出的结果看出:
 1 一个方法表示一个Element;
 2 方法中的参数代表此ELement的Attributes[propertyName:propertyValue]
 3 方法中如果propertyName 和propertyValue不是成对出现,只是出现了propertyValue,那么将会被设置为ELement的text值.

二 使用DomToGroovy类,将一个现有的XML转化Groovy MakeUpBuilder的相关代码:
class XmlExamples {
	static def CAR_RECORDS = '''
	  <records>
		<car name='HSV Maloo' make='Holden' year='2006'>
		  <country>Australia</country>
		  <record type='speed'>Production Pickup Truck with speed of 271kph</record>
		</car>
		<car name='P50' make='Peel' year='1962'>
		  <country>Isle of Man</country>
		  <record type='size'>Smallest Street-Legal Car at 99cm wide and 59 kg in weight</record>
		</car>
		<car name='Royale' make='Bugatti' year='1931'>
		  <country>France</country>
		  <record type='price'>Most Valuable Car at $15 million</record>
		</car>
	  </records>
	'''
  }

//使用DomToGroovy进行反向的转化:
import javax.xml.parsers.DocumentBuilderFactory
import org.codehaus.groovy.tools.xml.DomToGroovy

def builder     = DocumentBuilderFactory.newInstance().newDocumentBuilder()
def inputStream = new ByteArrayInputStream(XmlExamples.CAR_RECORDS.bytes)
def document    = builder.parse(inputStream)
def output      = new StringWriter()
def converter   = new DomToGroovy(new PrintWriter(output))

converter.print(document)
println output.toString()
打印出的结果如下:
//红色表示元素, 绿色表示属性, 黄色表示元素的text值
records() {
  car(make:'Holden', name:'HSV Maloo', year:'2006') {
    country('Australia')
    record(type:'speed', 'Production Pickup Truck with speed of 271kph')
  }
  car(make:'Peel', name:'P50', year:'1962') {
    country('Isle of Man')
    record(type:'size', 'Smallest Street-Legal Car at 99cm wide and 59 kg in weight')
  }
  car(make:'Bugatti', name:'Royale', year:'1931') {
    country('France')
    record(type:'price', 'Most Valuable Car at $15 million')
  }
}

三 为创建的XML添加NameSpace
实例代码:
def xml = new MarkupBuilder(writer)
xml.'rec:records'('xmlns:rec': 'http://groovy.codehaus.org') {
  car(name:'HSV Maloo', make:'Holden', year:2006) {
    country('Australia')
    record(type:'speed', ' Truck with speed of 271kph')
  }
}

result

<rec:records xmlns:rec='http://groovy.codehaus.org'>
  <car name='HSV Maloo' make='Holden' year='2006'>
    <country>Australia</country>
    <record type='speed'> Truck with speed of 271kph</record>
  </car>
</rec:records>

=================================
xml.records(xmlns: 'http://groovy.codehaus.org') {
  car(name:'HSV Maloo', make:'Holden', year:2006) {
    country('Australia')
    record(type:'speed', ' Truck with speed of 271kph')
  }
}

result

<records xmlns='http://groovy.codehaus.org'>
  <car name='HSV Maloo' make='Holden' year='2006'>
    <country>Australia</country>
    <record type='speed'> Truck with speed of 271kph</record>
  </car>
</records>


四 使用Groovy的StreamingMarkupBuilder创建XML:
示例代码:

import groovy.xml.StreamingMarkupBuilder

 def xml = new StreamingMarkupBuilder().bind {
    root {
      a( a1:'one' ) {
        b { mkp.yield( '3 < 5' ) } //注意点
        c( a2:'two', 'blah' )
      }
    }
  }

 println xml.toString();
 程序运行结果:
  <root>
      <a a1='one'>
          <b>3 < 5</b>
          <c a2='two'>blah</c>
      </a>
  </root>

五 使用Groovyapi结合Dom创建XML
   参考链接:http://groovy.codehaus.org/Creating+XML+with+Groovy+and+DOM
Groovy 集合类常用api之List篇
参考资料:
<<Programming Groovy>>
DefaultGroovyMethods源代码
Groovy collection 常用api之List篇:
1 each
 each 源代码<私有方法>:
 private static <T> Iterator<T> each(Iterator<T> iter, Closure closure) {
        while (iter.hasNext()) {
            closure.call(iter.next()); // 在闭包中改变it这个默认参数是达不到更改集合的效果的.
        }
        return iter;
    }

each 将集合中的每一个元素传递到闭包中执行,也就是闭包直接修改元素,并且是执行一个iterator,注意多线程同时修改引发的异常. 最终将处理完毕的List
返回,注意,在闭包中使用 it = "changedValue"是不会有效的!  例如:
def list = ["1",2,3,54]
list.each{
          if(it.equals("1")){
                //try to change the value,but it is noe affect the list!!
                it = "changed"

              }
    }
assert list == ["1",2,3,54]

如果想要得到闭包修改以后的集合,使用方法: collect
2 collect: 使得每一个集合元素都参与闭包的运算,并最终返回一个新的集合,此集合的每一个元素都是闭包执行后的结果.
源代码:<私有方法>
 public static Collection collect(Collection self, Collection collection, Closure closure) {
        for (Iterator iter = self.iterator(); iter.hasNext();) {
            collection.add(closure.call(iter.next()));
            if (closure.getDirective() == Closure.DONE) {
                break;
            }
        }
        return collection;
    }

测试:

def list = [1,2,3,4]
assert list.collect {
        it * 2;
     }  == [2,4,6,8]
//原来的集合不变
assert list == [1,2,3,4]
3 find方法以及findAll方法: 注意,find方法只查找第一个
   源代码:
    public static Object find(Object self, Closure closure) {
        for (Iterator iter = InvokerHelper.asIterator(self); iter.hasNext();) {
            Object value = iter.next();
            if (DefaultTypeTransformation.castToBoolean(closure.call(value))) { //如果满足条件
                return value; //只是返回第一个
            }
        }
        return null; //不满足闭包调价就返回null
    }

  测试代码:

  def list = [1,2,3,4]
  assert 1 == list.find {
           it < 5 //表明闭包会返回一个boolean
     }
 //原来的集合不变
assert list == [1,2,3,4]

====================findAll
<源代码>
 private static <T> Collection<T> findAll(Closure closure, Collection<T> answer, Iterator<T> iter) {
        while (iter.hasNext()) {
            T value = iter.next();
            if (DefaultTypeTransformation.castToBoolean(closure.call(value))) {
                answer.add(value); //把符合闭包条件的元素添加到新的集合answer中.
            }
        }
        return answer;
    }
4 inject 方法: 每次都会传入value和每一个集合元素给闭包,并返回闭包的执行结果,注意,闭包对应的参数是一个object[2],要有两个参数
 public static Object inject(Iterator self, Object value, Closure closure) {
        Object[] params = new Object[2];
        while (self.hasNext()) {
            Object item = self.next();
            params[0] = value;
            params[1] = item;
            value = closure.call(params);
        }
        return value;
    }

 测试代码:
def list = [1,2,3,4]
assert list.inject(1) {
            param1,
            param2
            ->

            param1 + param2;
     }  == 11 //(1+1,2+2,4+3,7+4),最终为11
5 一些辅助的集合方法:
5.1 sum()方法:
def list = [1,2,3,4]
assert list.sum() == 10
//代闭包的sum方法;
assert list.sum{
             it * 2
	} == 20
5.2 join()方法: 将集合合并
def list = [1,2,3,4]
assert list.join().class == String
assert list.join() == "1234"
//带上分隔符
assert list.join('|') == "1|2|3|4"
5.3 flatten方法:
 先将测试代码贴出;
 def list1 = [["Be" , "Productive" ], "In" , "Groovy" ];
 assert list1.flatten() == ["Be" , "Productive" , "In" , "Groovy" ]

 源代码贴出:
   DefaultGroovyMethods类中的代码:
   private static Collection flatten(Collection elements, Collection addTo) {
        for (Object element : elements) {
            if (element instanceof Collection) {
                flatten((Collection) element, addTo);
            } else if (element != null && element.getClass().isArray()) {
                flatten(DefaultTypeTransformation.arrayAsCollection(element), addTo);
            } else {
                // found a leaf
                addTo.add(element);
            }
        }
        return addTo;
    }

  DefaultGroovyMethodsSuport中的代码贴出:[这里只是贴出有关List的,map,set的请参考相关源代码]
  protected static <T> List<T> createSimilarList(List<T> orig, int newCapacity) {
        if (orig instanceof LinkedList)
            return new LinkedList<T>();

        if (orig instanceof Stack)
            return new Stack<T>();

        if (orig instanceof Vector)
            return new Vector<T>();

        return new ArrayList<T>(newCapacity);
    }
5.4 groupBy方法: public static <T> Map<Object, List<T>> groupBy(Collection<T> self, Closure closure) 方法根据传入的闭包执行以后, 闭包执行的结果被
封装为一个Map Entry的key,集合元素被封装为对应key的value. 源代码如下:
   public static <T> Map<Object, List<T>> groupBy(Collection<T> self, Closure closure) {
        Map<Object, List<T>> answer = new LinkedHashMap<Object, List<T>>(); //创建相关的MAP
        for (T element : self) {
            Object value = closure.call(element);//执行闭包,并保存闭包的执行结果到value
            groupAnswer(answer, element, value);
        }
        return answer;
    }

 //下面是groupAnser的源代码:
    protected static <T> void groupAnswer(final Map<Object, List<T>> answer, T element, Object value) {
        if (answer.containsKey(value)) {
            answer.get(value).add(element);
        } else {
            List<T> groupedElements = new ArrayList<T>(); //如果闭包的执行结果value不存在Map的keySet中,
             建立一个新的ArrayList存放对应集合元素
            groupedElements.add(element);
            answer.put(value, groupedElements);//加入Map中.
        }
    }
5.5 count函数: 计算传入参数值匹配的个数,相当于在一个集合中统计出现元素的次数. 示例代码:
assert [2,4,2,1,3,5,2,4,3].count(4) == 2
Grails (一)
参考资料:
InfoQ ----- Grails 入门指南:
http://www.cjsdn.net/doc/jvm/grails/docs/1.1/guide/2.%20Getting%20Started.html#2.5%20Getting%20Set-up%20in%20an%20IDE Grails Getting Started
Grails 安装配置:
1 下载grails : http://grails.org/Download 获取grails
2 解压, 类似JDK一样配置:GRAILS_HOME=%groovy_install_root%;
并将%groovy_install_root%bin 追加到PATH环境变量中[注: %groovy_install_root%是grails解压后的目录];
3 cmd 运行 grails 以检查配置的正确性;
创建Grails项目
到达你指定的一个grails work space, 在cmd中cd 到此目录,运行命令: grails create-app <your_app_name>;
从命令的执行信息看出grails会去下载一些jar包,包括了spring,Hibernate ,commons-*,ejb3,servlet,以及日志jar包等等; 其实,在你解压
的grails目录下面的lib目录中就有相关的jar包,之所以create-app命令执行比较快是因为其不用网络下载. 就向maven引用本地jar包一样. 此
目录的输出是: 建立C:\Documents and Settings\User\.grails 目录;
建立C:\Documents and Settings\User\.ivy2 目录[包含jar包]
建立相关的工程目录如下截图:
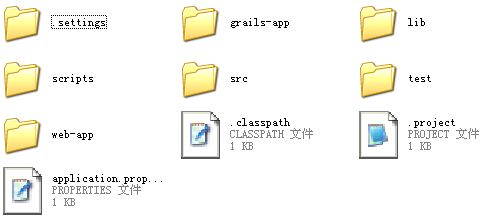
可以看到.classpath文件和.project文件. 可以带入到eclipse当中; 导入的时候, 可能会报错: 无法找到groovy.lang.GroovyObjectjar包,
此时可以到C:\Documents and Settings\User\.ivy2中找到groovy-all的依赖包. 工程加入jar包以后就没问题了.
创建相关的领域模型:
上一个步骤创建了相关的目录结构,在grails中,是使用"惯例大于配置"的方式. 使用这样的方式可以省去很多繁琐的配置文件信息. 具体每个目录代表什么意思,
请参考: http://www.cjsdn.net/doc/jvm/grails/docs/1.1/guide/2.%20Getting%20Started.html#2.5%20Getting%20Set-up%20in%20an%20IDE
下面创建一个User 类的domain model:
cd <刚刚创建的app目录>
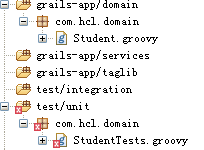
grails create-domain-class com.hcl.domain.Student
上面的命令告诉grails,在<your-app-root-dir>\grails-app\domain 下面创建一个包:com.hcl.domain 再创建一个类:Student.groovy 由于Grails是敏捷开发的工具,
避免不了TDD的思想,于是,grails还会在工程<your-app-root-dir>\test\unit 下面添加单元测试文件com.hcl.domain.StudentTests.Groovy.如下截图:
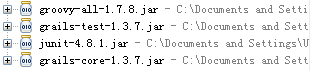
注意,当你将工程导入Eclipse的时候,加入依赖的jar包[截止此步骤至少含有的jar包]:
开始编写你的Student类吧,如果使用过Hibernate, 就应该很快了. 首先看看grails生成的Student.groovy文件:
class Student {

    static constraints = {
    }
}

static constrants是grails自动生成的, 至于作用是什么,等等再介绍.
下面考试添加一些属性:
class Student {

    String studentName;
    long studentNumber;
    Integer studentAge;
    Date studentBirthDay;
    String studentPhone;

    static constraints = {
    }
}

使用哪个同样的方式[grails create-domain-class com.hcl.domain.Teacher],或者直接在Eclipse上创建相关的脚本文件Tearch:

class Teacher {

    String teacherName;
    String teacherNumber;
    Integer teacherAge;
    String teacherPoneNumber;

    static constraints = {
    }
}

NOTE: [下面给出一些比较犀利的使用方法, 只是作为提醒, 如果使用到,就到官方文档库里面搜搜吧.]

      1  Grails允许你定义一些特殊地位字段,所谓特殊就是grails会对这些字段进行"特殊关照". 例如: Date dateCreated 和 Date lastUpdated 等等.
         详细说明请参考相关给出的文档;

      2  Grails允许你使用Groovy闭包来定义相关的一些类似"触发器"的程序;

      3 在static mapping ={..}闭包中,可以使用"sort "Property" " 之类的结果映射附加操作.
        请参考:http://grails.org/GORM+-+Mapping+DSL 这篇文档;
创建Controller:
使用 grails create-controller com.hcl.controllers.Student 来创建一个关于Student的控制器. grails会自动在Student后面加上
Controller: StudentController
class StudentController {

    def index = { }
 }

命令同样会生成相关的测试类:
import grails.test.*

class StudentControllerTests extends ControllerUnitTestCase {
    protected void setUp() {
        super.setUp()
    }

    protected void tearDown() {
        super.tearDown()
    }

    void testSomething() {

    }
}

当然,同样需要将相关的依赖jar包导入, jar包路径和在生成domain的时候一样的方式寻找.
在StudentController中添加代码如下:
    def index = {
        render("Hello ,Grails World!");
        }

    def helloStudent = {
        render("Hello Student!");
        }
现在可以启动项目了, 可以首先使用:grails help 命令查看grails的相关命令,发现:grails run-app 然后敲此命令:
打开浏览器:

http://localhost:8080/<your_app_name>/student[注意,student是我们创建的controller],这个时候浏览器显示:

"Hello,Grils World!"

敲入:

 http://localhost:8080/<your_app_name>/student/helloStudent [helloStudent是在StudentController中添加的一个闭包] 验证一下是否打印出"Hello Student!"

通过上面的运行结果看出:
 Grails 首先去找你的conreoller,找到以后再找你url后面跟着的groovy闭包名称, 然后执行. 最后使用render("")方法渲染页面.
 整个过程没有任何配置文件的干预, 可见上面叫"约定大于配置"原则.

再看看一个相当神奇的controller属性: <添加一个属性到StudentController.groovy文件>如下: def scaffold = Student;
添加完毕以后注意引入包:import com.hcl.domain.* 并且把相关的闭包都去掉!!!; 代码如下:
class StudentController {

	def scaffold = Student;

//注意把下面的闭包注释掉:
//    def index = {
//		render("Hello ,Grails World!");
//		}
//
//	def helloStudent = {
//		render("Hello Student!");
//		}
}


进入:http://localhost:8080/racetrack/student/  截图如下[现在暂时没有数据,如果有数据,会是一个关于Student的列表!!!]:
 点击右边的"New Student" ,截图如下:
 看到了么? 神奇的地方时只用了一个def scaffold = Student;属性.
java Socket(阻塞) api记录点
参考资料:
《Java TCP/IP Socket 编程》 2ed
记录点:
1 accept(),read()和receive()
对于这些方法,我们可以使用Socket类、ServerSocket类和DatagramSocket类的setSoTimeout()方法,设置其阻塞的最长时间(以毫秒为单位)。如果在指定时间内这些方法没有返回,则将抛出一个InterruptedIOException异常。对于Socket实例,在调用read()方法前,我们还可以使用该套接字的InputStream的available()方法来检测是否有可读的数据.
2 一般在建立Socket的时候,如下: 由于默认的到参数的构造器时阻塞的,并且系统的超时时间定义得比较长.
Socket socket = new Socket();
try{
  socket.connect(SocketAddress endpoint,int timeout);
}catch(SocketTimeOutException e){
       ... do with timeOut...
}catch(OtherException){
       ... do with other Exception...
 }
3 write方法
write()方法调用也会阻塞等待,直到最后一个字节成功写入到了TCP实现的本地缓存中。如果可用的缓存空间比要写入的数据小,在write()方法调用返回前,必须把一些数据成功传输到连接的另一端。因此,write()方法的阻塞总时间最终还是取决于接收端的应用程序。不幸的是Java现在还没有提供任何使write()超时或由其他线程将其打断的方法。所以如果一个可以在Socket实例上发送大量数据的协议可能会无限期地阻塞下去。
4 使用setSoTimeout()方法粗略的实现为每个Socket客户端提供有限的服务时间.之所以说是"粗略",是因为我们没有办法控制:write()方法. 服务器端的线程方法大体如下:
long endTime = System.currentTimeMillis() + timelimit;
int timeBoundMillis = timelimit; clntSock.setSoTimeout(timeBoundMillis);

wile((timeBoundMillis > 0) &&((recvMsgSize = in.read(echoBuffer)) != -1)) {

 out.write(echoBuffer, 0, recvMsgSize);
 totalBytesEchoed += recvMsgSize;
 timeBoundMillis = (int) (endTime - System.currentTimeMillis()) ;

 clntSock.setSoTimeout(timeBoundMillis); //每一次的读取或者输出操作后.重新设置timelimit

 }

//注意处理超时的异常:
5 默认的Keep-Alive 机制:
如果一段时间内没有数据交换,通信的每个终端可能都会怀疑对方是否还处于活跃状态。TCP协议提供了一种keep-alive的机制,该机制在经过一段不活动时间后,将向另一个终端发送一个探测消息。如果另一个终端还出于活跃状态,它将回复一个确认消息。如果经过几次尝试后依然没有收到另一终端的确认消息,则终止发送探测信息,关闭套接字,并在下一次尝试I/O操作时抛出一个异常。注意,应用程序只要在探测信息失败时才能察觉到keep-alive机制的工作。
6 发送和接收缓存区的大小:
一旦创建了一个Socket或DatagramSocket实例,操作系统就必须为其分配缓存区以存放接收的和要发送的数据:
int getReceiveBufferSize()
void setReceiveBufferSize(int size)
int getSendBufferSize()
void setSendBufferSize(int size)
为ServerSocket调用这些方法的时候,相当于为其accept()方法接收的Socket分配缓冲大小;
7 地址重用:
对于TCP,当一个连接关闭后,通信的一端(或两端)必须在"Time-Wait"状态上等待一段时间,以对传输途中丢失的数据包进行清理(见第6.4.2节)。不幸的是,通信终端可能无法等到Time-Wait结束。对于这两种情况,都需要能够与正在使用的地址进行绑定的能力,这就要求实现地址重用。
boolean getReuseAddress()
 void setReuseAddress(boolean on)
8 消除缓冲延迟:
TCP协议将数据缓存起来直到足够多时一次发送,以避免发送过小的数据包而浪费网络资源。虽然这个功能有利于网络,但应用程序可能对所造成的缓冲延迟不能容忍。好在可以人为禁用缓存功能:
boolean getTcpNoDelay()
void setTcpNoDelay(boolean on)
9 紧急数据:
void sendUrgentData(int data)
boolean getOOBInline()
void setOOBInline(boolean on)
要发送紧急数据需要调用sendUrgentData() 方法,它将发送其int参数的最低位字节。要接收这个字节,必须为setOOBInline()方法传递true参数启用接收者对频道外数据的接收。该字节在接收者的输入流中被接收。发送于紧急字节之前的数据将处于接收者的输入流中的紧急字节前面。如果没有启用接收者接收频道外数据的功能,紧急字节将被无声地丢弃。
注意Java中的紧急数据几乎没什么用,因为紧急字节与常规字节按照传输的顺序混在了一起。实际上,Java接收者并不能区分其是否在接收紧急数据
10 关闭后停留:
当调用套接字的close()方法后,即使套接字的缓冲区中还有没有发送的数据,它也将立即返回。这样不发送完所有数据可能导致的问题是主机将在后面的某个时刻发生故障。其实可以选择让close()方法"停留"或阻塞一段时间,直到所有数据都已经发送并确认,或发生了超时.
int getSoLinger()
void setSoLinger(boolean on, int linger)

如果发生了超时,TCP连接将强行关闭
11 基于性能的协议选择:
void setPerformancePreferences(int connectionTime, int latency, int bandwidth)
12 关闭连接:
调用Socket的close()方法将同时终止两个方向(输入和输出)的数据流.
Socket类的shutdownInput()和shutdownOutput()方法能够将输入输出流相互独立地关闭。调用shutdownInput()后,套接字的输入流将无法使用。任何没有发送的数据都将毫无提示地被丢弃,任何想从套接字的输入流读取数据的操作都将返回-1。当Socket调用shutdownOutput() 方法后,套接字的输出流将无法再发送数据,任何尝试向输出流写数据的操作都将抛出一个IOException异常。在调用shutdownOutput()之前写出的数据可能能够被远程套接字读取,之后,在远程套接字输入流上的读操作将返回-1。应用程序调用shutdownOutput()后还能继续从套接字读取数据,类似的,在调用shutdownInput()后也能够继续写数据。
Visitor Parttern
参考资料:
http://en.wikipedia.org/wiki/Visitor_Pattern wiki Visitor Pattern
Visitor Pattern:
模式背景: 今天在看<<java 并发编程 设计原则与模式>>中, 涉及到了Visitor模式. 在并发过程中, 当一个类中持有一个集合的时候, 如果需要遍历这个集合,
就不能单纯的考虑把整个集合返回给调用方.因为这样就给调用方提供了改变集合的操作. 试想,当你花费了大量的synchronized方法或者使用了多
么高明的lock-free算法进行性能上的优化,一旦你向外界返回了你要保护的对象,一切都将是一场"灾难". 矛盾的是, 你无法预测客户会使用什么样
的方式来进行对你集合中的元素进行操作. 困难如下:
    private List<T> yourList;
    .....

    public synchronized void  doIterator(){

          for(T t: yourList){

              <how to do with element e ...??>

              }
    }
你如何确认对方需要做的操作时什么呢? 答案是没有. 基于面对对象的操作. 遍历的方式不变, 如果是串行的数据结构,无非就是循环. 如果是树状结构那么可能会不一样的遍历方式. 就如同蛋糕店中一样,他们给你返回了蛋糕,可是要怎么去吃,那是你自己的事情. 想到这点, 就应该清楚一件事情, 调用方的操作理应"自己知道".那么就变成了如下的形式:
    private List<T> yourList;
    .....

    public void doIterator(Client : client){

          for(T t: yourList){

               client.doWithElemnt(t);
              }
    }
看到这里, 也许还有问题: 我怎么知道你是使用"doWithElemnt(..)"这个方式去消费呢? 换句话说,这是一种约定,java中,标准时用Interface来表示. 这样就形成了这样的一个"调用方"的结构:
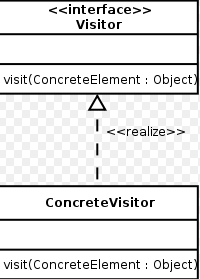
当有client来遍历的时候,就调用它的visit方法,并把蛋糕给他. 事情就是这么简单!
客户的问题解决了,但是客户真正想要的是蛋糕,并不是整个"蛋糕池". 理解这一点很重要, 因为它进一步确定了我们不应该在doIterator方法中调用客户端.
而是应该在List<T>的每一个t上调用,代码进一步更改:
    private List<T> yourList;
    .....

    public void doIterator(){

          for(T t: yourList){

                  t.accept(visitor);
              }
    }

   ... T 中的accept方法如下:
       visitor.visit(this);
如此一来, doIterator方法拜托了visitor的依赖. 那么,在doIterator方法中,有怎么样知道就是需要调用t.accept()方法呢? 一样地, Interface的标准化.
这么一来,就形成了visitor模式:
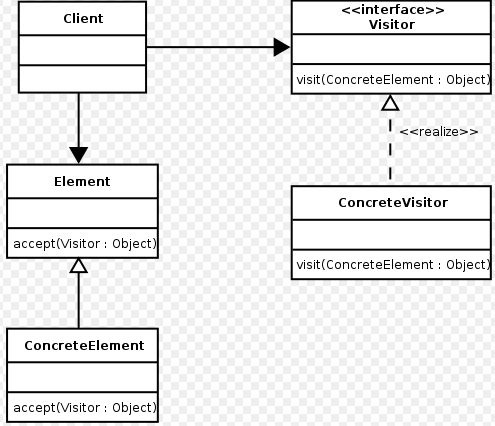
结束语: 可以使用java Reflection的反射机制使得Viditor模式更加具有灵活性.
InfoQ:代码之丑 归纳
参考资料:
http://www.infoq.com/cn/news/2010/11/ugly-code-0 【或者直接google:(InfoQ:代码之丑)】
此文章是关于笔者读infoQ文章所做出的归纳,详细的信息见参考链接.感谢原作者的分享! 由于篇幅, 只是简单的小结.还需要作者原文作为指导.
文中的小结有些事在原文中继续讨论,若有不当,请指出! 谢谢.
Ugly-Code:
if(db.Next()) {
    return true;
} else {
    return false;
}

优化: return db.Next();
-----------------------------------

if(!strcmp(pRec->GetType(), RECTYPE::INSTALL)) {
    CommDM.ChangGroupInfo(const_cast(CommDM.GetAttr("IPAddress", &(pGroup->m_Attr))), true);
} else {
    CommDM.ChangGroupInfo(const_cast(CommDM.GetAttr("IPAddress", &(pGroup->m_Attr))), false);
}

优化为:

const char* msg = (0 == retCode ? "Process Success" : "Process Failure");
SendMsg("000", msg, outResult);

-----------------------------------
if ( strcmp(rec.type, "PreDropGroupSubs") == 0
     || strcmp(rec.type, "StopUserGroupSubsCancel") == 0
     || strcmp(rec.type, "QFStopUserGroupSubs") == 0
     || strcmp(rec.type, "QFStopUserGroupSubsCancel") == 0
     || strcmp(rec.type, "QZStopUserGroupSubs") == 0
     || strcmp(rec.type, "QZStopUserGroupSubsCancel") == 0
     || strcmp(rec.type, "SQStopUserGroupSubs") == 0
     || strcmp(rec.type, "SQStopUserGroupSubsCancel") == 0
     || strcmp(rec.type, "StopUseGroupSubs") == 0
     || strcmp(rec.type, "PreDropGroupSubsCancel") == 0)

优化:
bool shouldExecute(Record& rec) {
   static const char* execute_type[] = {
     "PreDropGroupSubs",
     "StopUserGroupSubsCancel",
     "QFStopUserGroupSubs",
     "QFStopUserGroupSubsCancel",
     "QZStopUserGroupSubs",
     "QZStopUserGroupSubsCancel",
     "SQStopUserGroupSubs",
     "SQStopUserGroupSubsCancel",
     "StopUseGroupSubs",
     "PreDropGroupSubsCancel"
   };

   int size = ARRAY_SIZE(execute_type);
   for (int i = 0; i < size; i++) {
     if (strcmp(rec.type, execute_type[i]) == 0) {
       return true;
     }
   }

   return false;
 }

其实,上面的代码是可以进一步重构的,笔者的理由如下: 当这个常量集合中的其中一个需要修改或者提出,那么当我们进一步的去找这个常量集合的话,
可能会出现代码重构中提及到的"发散式的修改".那么我们有必要将它提出来进行重构. java中,不需要循环,需要的是contains.
---------------------------------------
switch(firstChar) {
  case ‘N’:
    nextFirstChar = ‘O’;
    break;
  case ‘O’:
    nextFirstChar = ‘P’;
    break;
  case ‘P’:
    nextFirstChar = ‘Q’;
    break;
   ...... ......
}

进一步优化:
switch(firstChar) {
  case ‘N’:
  case ‘O’:
  case ‘P’:
    nextFirstChar = firstChar + 1;
    break;
  case ‘T’:
    throw new IllegalArgument();
  default:
 ...... .....
  }

进一步优化:
if (firstChar >= ‘N’ && firstChar <= ‘S”) {
    nextFirstChar = firstChar + 1;
  } else {
    throw new IllegalArgument();
  }

笔者认为,如果上述的switch是无法预测其关系的,那么, 基于key--value的方式..... 并且要注意switch的陷阱,哪些不在switch范围的数值应该如何处理?

-------------------------------------------
还记得Struts1中, 将ActionForm转化为一个Entity实体的做法么? 是直接一大串的setProperty()操作呢,还是使用BeanUtils.copyProperty(..)? 那么,
当这些属性却是是需要在old version中进行操作后copy到一个新的对象中, 笔者认为在重构上, 把copy的代码提出来绝对是好的.但是,是提出到方法
中么 ? 如果提出到当前的类中, 试想,当其他类也完成这种操作的时候,是不是出现了"不同类代码重复"呢? 工具类! 那么,是否应该继承些什么,有一个
默认的操作呢?

------------------------------------------
不要忘记对参数进行检查, 代码的可行性必须依赖于参数的正确性,否则,再强的代码也会是失败的. 检查代码的时候, throw new YourException.
------------------------------------------

  if(attr->status() == STATUS_NEW || attr->status() == STATUS_MODIFIED) {
      if(strcmp(attr->attrID(), "CallFunc") == 0) {
        if(0 == strcmp(attr->attrValue(), "1")) {
          IsCallFunc = 1;
        } else if(0 == strcmp(attr->attrValue(), "0")) {
          IsCallFunc = 0;
        }
      }
多层次的if语句,是不是应该考虑使用: boolean result = condition1 && condition2;的方式更为可读?
Groovy Process Xml(解析XML)
参考资料:
http://groovy.codehaus.org/Processing+XML 官方Groovy xml 操作
测试的xml文件内容:
<?xml version="1.0" encoding="UTF-8"?>
<books location="theLocation">
  <book bookid="1" mark="4">Java in action</book>
  <book bookid="2" mark="3">Groovy in action</book>
  <book bookid="3" mark="2">JavaScript in action</book>
  <book bookid="4">
      <position url="http://">
         <property name="propertiName1">Hello</property>
         <property name="propertiName2">World</property>
      </position>
  </book>
</books>
解析XML示例1:
def books = new XmlParser().parse("testXml.xml"); //参见groovy.util.XmlParser类的api

println langs.attributes().get("location");
//下面的语句更加具有"魅力",因为book是xml中的一个Element,Groovy能够很清楚的知道它是一个Node.
books.book.each {
	            def bookid = it.attributes().get("bookid");
				println bookid;
	 }
解析XML示例二: 使用数组的下标直接定位;
def books = new XmlParser().parse("testXml.xml");
def bookCollection = books.book;
def book = bookCollection[0];
assert book.text() == "Java in action";
assert book.'@bookid' == "1";
解析XML示例三: 解析示例xml中Position
def file = new XmlParser().parse("testXml.xml");
def books = file.book;
def specialBook = books[3];

assert specialBook.'@bookid' == "4";
def properties = specialBook.position[0].property; //获取position的值;

properties.each {
	   println "-------------------"
	   println it.'@name';
	   println it.text();
	   println "-------------------"
	}
解析XML示例四: 挑选合适的集合并使用排序的方式:
xmlFile.book.findAll {
	        it.attributes().keySet().contains("mark"); //先找到含有"mark"的标签, 因为有一个book是没有这个属性的,
                                                                                  //为了避免有些操作会抛出NullPointException.
	 }.sort{
	        it.'@mark'.toInteger(); //排序的依据
	 }.each {
	       println it.'@bookid';
	  }
结束语: 在groovy的文档中,还有很多的方便的解析方式, 这里只是使用了XmlParser这个类来解析.其他的方式可参考Groovy文档,很齐全!
Groovy IO
参考资料:
http://groovy.codehaus.org/groovy-jdk/java/io/File.html Groovy JDK File 文档;
http://groovy.codehaus.org/JN2025-Streams Groovy 官方文档之IO操作
前言: 文章内容收集自互联网以作备忘, 感谢各位作者的支持.
Groovy IO 操作:
1 将文本放置到一个String 对象中.
def textFileContent;

   try{
	     textFileContent = new File("testFile.txt").getText();
	}catch(IOException e){
	   println "系统找不到文件";
	}
2 使用闭包操作:
  try{
	  def fileContent = new File("testFile.txt").eachLine {
		           println it.getClass();
		   }

	}catch(Exception e){
	     e.printStackTrace();
		 }
3 将文件内容用List收集:
	 try{
		     def fileContentAsList = new File("testFile.txt").readLines();
		     assert fileContentAsList.getClass() == java.util.ArrayList.class;
		 }catch(Exception e){
		     e.printStackTrace();
		 }
4 用特殊的字符分割每一行<ArrayList>,使用内敛函数操作:
  try{
	     text = new File("testFile.txt").splitEachLine(',') {
			      //do you code
			  }
	}catch(Exception e){
	   e.printStackTrace();
	 }
5 处理二进制文件:
new File("foo.bin").eachByte { ... }
6 文件的写操作:
new File("testFile.txt").write("...");
----文件的追加
new File("foo.txt").append("...");
Velocity-VelocityLayoutServlet
参考资料:
http://velocity.apache.org/tools/devel/view/layoutservlet.html velocity官方资料
http://velocity.apache.org/engine/devel/user-guide.html 官方Velocity User-Guide
VelocityLayoutServlet:
提前先看:http://velocity.apache.org/tools/devel/view/ 如何使用VelocityViewServley.
1 更改web.xml
<servlet-class>org.apache.velocity.tools.view.servlet.VelocityLayoutServlet</servlet-class>
2 在velocity.properties文件中加入:
# Directory for layout templates,
#  relative to web application root directory
#指向布局的目录 web-root下面的layout目录
tools.view.servlet.layout.directory = layout/

#指向默认布局的相关页面.
# Filepath of the default layout template
#  relative to the layout directory
#  NOT relative to the root directory of the webapp!
tools.view.servlet.layout.default.template =  Default.vm<html>
3 在布局中使用$screen_content做为内容占用符:
<html>
<head>
  <title>$!page_title</title> //"!"符号指,当page_title为null的时候显示空白,如果单纯的使用$page_title,
                                          没值的时候将显示出"$page_title"这样的文本
</head>
<body>
  $screen_content
</body>
</html>
需要注意的是title的内容依然是由$scrren_content的title来控制.在$scrren_content中使用#set($page_title="set you title")改变.
4 设置其他的模板:
(a)在请求的参数中添加:loyout=otherLoyout.vm
(b)在请求的页面中添加#set($loyout="otherLyout.vm")
5 加入其他的页面,例如"导航栏","页眉","页脚"等模板元素:
<html>
<head>
  <title>$!page_title</title>
</head>
<body>

$screen_content

#parse( $screen_footer )

</body>
</html>

只需要在你定义好的$creen_content 模板中定义#set($scrren_footer="your footer")就ok.
6 下面是一个含有:上,下,左导航栏和main_scrren 主模板的布局:
# <html xmlns="http://www.w3.org/1999/xhtml" xml:lang="en">
#     <head>
#
#     </head>
#     <body>
#         <div id="header>#parse('vm/layout/header.vm')</div>
#         <div id="content">
#             <div id="sub">#parse($leftNavigation)</div>
#             <div id="main">$screen_content</div>
#         </div>
#         <div id="footer">#parse('vm/layout/footer.vm')</div>
#     </body>
# </html>

在scrren_content中设置sub: #set($leftNavagation,"your sub Navagation template");
并设置它所选用的layout: #set($layout,<上面的layout>);
TDD 单元测试 JMock<1>
参考资料:
http://www.jmock.org/cookbook.html JMock的cookbook 使用手册
http://www.ibm.com/developerworks/cn/java/j-lo-testpartten/ 使用设计模式使得单元测试更加简单.
<<Agile Java>> 敏捷开发 TDD思想相关书籍
http://groovy.codehaus.org/Using+JMock+with+Groovy//Groovy 中使用JMock
java JMock 编写单元测试:
导入相关的jar,引入相关的包:
import org.jmock.Expectations;
import org.jmock.Mockery;
import org.jmock.integration.junit4.JUnit4Mockery;
import org.jmock.lib.legacy.ClassImposteriser;
import static org.hamcrest.Matchers.*;
初始化: 要使用JMock模拟一般的java类时,就需要CGLib的"增强字节码"能力.而不是java一般的动态代理.
context = new JUnit4Mockery() {{
 	        setImposteriser(ClassImposteriser.INSTANCE);
 	    }};
mock 一般方法[无返回值]:
context.checking(new Expectations() {{
      oneOf (subscriber).receive(message);
}});
mock 具有返回值的方法:
//返回一个迭代器.方法无参数
context.checking(new Expectations() {{
    oneOf (YourMockClass).mockMethod();
    will(returnIterator(testReturnedItreator));
}});

//返回一个对象.方法无参数
context.checking(new Expectations() {{
    oneOf (YourMockClass).mockMethod();
    will(returnValue(testReturnedItreator));
}});

//返回一个对象,方法参数是任何的String类型
context.checking(new Expectations() {{
    oneOf (YourMockClass).mockMethod(with(any(String.class)));
     will(returnValue(testReturnedObject));
}});

  注意: 上述的oneOf() 已经指定mock对象的mock方法只会被调用一次!!! 如下的示例是能够调用"至少一次",并针对每一次的调用可以指定不同的返回值:

context.checking(new Expectations() {{
            atLeast(1).of(dbHelper).getUserById(with(any(String.class)));
                 will(onConsecutiveCalls(
                         returnValue(highRiskUser),
                         returnValue(nomalUser)

                 ));
        }});

//..其他类似的方法见:http://www.jmock.org/returning.html
mock 异常的
context.checking(new Expectations() {{
			allowing(dbHelper).getUserById(with(any(String.class)));
			will(Expectations.throwException(MOCK_SQL_EXCETION)); //模拟一个SQLException的发生.
        }});
mock 方法的不同参数,并且返回不同的结果[包括抛出异常情况]
allowing (calculator).add(1,1); will(returnValue(3));
allowing (calculator).add(2,2); will(returnValue(5));
allowing (calculator).sqrt(-1); will(throwException(new IllegalArgumentException());

模拟方法被调用的次数:
one   (calculator).load("x"); will(returnValue(10));  //调用一次,
never (calculator).load("y");  //从不调用
mock matchers: 在new Expectations(){....}中, 一般会加入 allowing(...).add(<A>),A区域称为"参数匹配"区域. jmock允许我们做一些模糊的参数匹配,如下:
allowing (calculator).sqrt(with(lessThan(0)); will(throwException(new IllegalArgumentException());
//参数小于0,抛出异常
oneOf (log).append(with(equal(Log.ERROR)), with(stringContaining("sqrt")); //两个参数, 一个equasls(Log.ERROR),另一个是包含了“sqrt”的参数;
oneOf (mock).doSomething(with(aNull(String.class)), aNonNull(String.class)));
oneOf (mock).doSomething(with(eq(1)), with(any(String.class)));
oneOf (mock).doSomething(with(not(eq(1)));
oneOf (mock).doSomething(with(allOf(stringContaining("hello"), stringContaining("world"))));//参数是一个String包括hello,world两个单词
oneOf (mock).doSomething(with(anyOf(stringContains("hello"),stringContains("howdy"))));//参数是一个String包括了hello或者world
mock 匹配方法的调用次数:
| one | The invocation is expected once and once only. |
| exactly(n).of |
The invocation is expected exactly n times. Note: one is a convenient shorthand for exactly(1). |
| atLeast(n).of | The invocation is expected at least n times. |
| atMost(n).of | The invocation is expected at most n times. |
| between(min, max).of | The invocation is expected at least min times and at most max times. |
| allowing | The invocation is allowed any number of times but does not have to happen. |
| ignoring |
The same as allowing. Allowing or ignoring should be chosen to make the test code clearly express intent. |
| never | The invocation is not expected at all. This is used to make tests more explicit and so easier to understand. |
mock 忽略相关的mock对象的所有方法,这里的忽略是返回一个"默认"的值:
ignoring (hibernateSessionFactory);
| Return Type | "Zero" Value |
|---|---|
| boolean |
false |
| numeric type | zero |
| String | "" (empty string) |
| Array | Empty array |
| Mockable type | A mock that is ignored |
| Any other type |
null |
code_money_guji
分类
- 性能
- Jms
- Groovy
- 敏捷/TDD
- Apache-Camel
- javaSE
- jvm
- Apache-commons-collections
- 未分类
- Concurrency in java
- javaNIO & Mina
- taobao WEBX
- NoSQL
- Linux
- Spring 源代码分析
- java 内存
- C/C++
- 算法/数据结构
- 设计模式/架构
- Apache-common-pool/dbcp
- Happy_Code_Mokey
- java 常见问题
- maven
- Somthing More
- web_front-end
- 代码重构